
I’ve been in awe of the Momofuku restaurants for years, ever since baking my first Crack Pie for a friend’s birthday party. The way they use sophisticated techniques to bring haute cuisine together with little kid garbage food never ceases to delight me. Which is why it was such a disappointment going to Ssäm Bar for the first time last year. I tasted an array of creative but not stunningly delicious food and because of the way service is there we ate our seven courses in about forty-five minutes. That’s definitely not how I like to eat.
Still, the recipes are amazing. This past weekend I had a bunch of friends over for a barbecue and made several dishes from the Momofuku cookbook. I was initially intimidated by the cookbook because their recipes have so many steps, recipes within recipes. However, no one step is actually all that difficult. If you’re already insane about cooking, and do your own canning and pickling, then Momofuku is nothing to be frightened of.
I always wind up barbecuing too early in the season. In our party dresses, my friends and I stood around the coals for warmth as the wind snaked around our bare legs. Still, oh my fucking God was the food good. And there’s nothing better for impressing your friends than serving pork belly at a barbecue instead of burgers and hot dogs.
We had seven carnivorous guests (the best kind) and these recipes served all of them with about two servings leftover for an amazing hung-over brunch the following day.
The meat, kimchi, rice, and condiments are to be served with lettuce in order for people to make their own wraps.
Momofuku Barbecue
(All recipes are adapted from Momofuku by David Chang and Peter Meehan unless otherwise noted)
The Meat
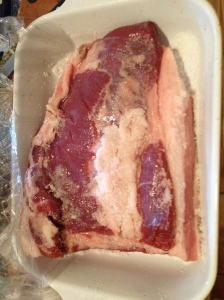
Pork Belly Ssäm
1 3 lb skinless slab of pork belly
¼ cup kosher salt
¼ cup sugar
1.) Place the pork belly in a smallish pan that can hold it snugly. Combine the sugar and salt and rub it into the pork belly all over. Cover and refrigerate overnight.
2.) Heat oven to 450 degrees Fahrenheit. Discard liquid in pan and cook pork belly for 1 hour, basting occasionally and turning the pork over at the halfway point.
3.) Reduce heat to 250 degrees Fahrenheit and cook for 30 minutes more. Allow belly to cool and wrap it in plastic wrap and stick it back in the fridge. The cooking can be done on the morning of your barbecue.
4.) Start your grill and allow the coals to burn down for about half an hour. Slice the pork belly into small slices, about two inches wide and a half an inch thick.
5.) Grill the slices about a minute or two per side until they’re seared or the fat begins to crackle.
Marinated Hanger Steak Ssäm
2 cups sugarless apple juice
½ cup soy sauce
½ yellow onion
6 garlic cloves
1-teaspoon sesame oil
1 teaspoon ground black pepper
4 8-ounce hanger steaks.
1.) Combine all ingredients except steaks and place in a zip lock bag. Add steaks and allow to sit refrigerated overnight.

2.) When your coals are hot, grill each steak about five minutes per side for rare to medium rare.
The Accompaniments
Kimchi
(Adapted from David Lebovitz)
To be started at least six days before your barbecue.
1 head Napa cabbage
2 tablespoons kosher salt
1/3-cup white rice vinegar
3 tablespoons Korean chili paste, gochujang
1 tablespoon minced garlic
2 tablespoons coarse Korean chili powder, gokchu garu
½ tablespoon minced fresh ginger
4 scallions, white and green parts, cut into two-inch slices.
1.) Remove outer leaves and core of the cabbage and cut into small pieces. Toss in salt and transfer to a colander. Set a bowl under the colander and a plate and heavy weight on top of it. I used a teapot. Leave to brine 24 hours.
2.) The following day mix vinegar, chili paste, garlic, chili powder and ginger together.
3.) Squeeze water out of cabbage and add in small batches to the marinade. Mix together, add scallions and back closely into a jar. Cover the jar tightly and leave on the counter for 48 hours.
4.) Refrigerate for 4 days, then serve.
Scallion Ginger Relish
To be served with the steaks and made on the day of your barbecue.
2 ½ cups thinly sliced scallions (from about 3 bunches) using the white and green parts
½ cup minced ginger
¼ cup grape seed oil
1 ½ teaspoons soy sauce
¾ teaspoon sherry vinegar
¾ teaspoon kosher salt
Mix together ingredients and taste for seasoning.
Mustard Seed Sauce
To be begun at least the day before your barbecue and served with the pork belly.
6 tablespoons pickled mustard seeds (recipe follows)
3 tablespoons quick pickled cucumbers (recipe follows)
3 tablespoons Dijon mustard
1-tablespoon spicy mustard
3 tablespoons mayonnaise
3 tablespoons scallions (green and white parts)
Kosher salt
Black pepper
Combine all ingredients and season to taste with salt and pepper.
Pickled Mustard Seeds

1 cup yellow mustard seeds
11/2 cups water
1 ½ cups white rice vinegar
½ cup sugar
1-tablespoon kosher salt
1.) Combine mustard seeds, water, vinegar, sugar, and salt in a saucepan and bring to a simmer over low heat. Cook mustard seeds, stirring frequently, until soft, about 45 minutes to an hour.

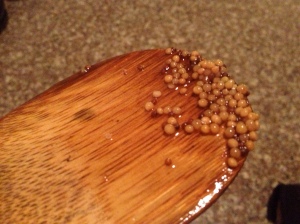
2.) Store pickled mustard seeds and whatever brine is left in a tightly covered container in the fridge.
Quick Pickled Cucumbers
3 Kirby cucumbers, thinly slices
1 1/2 tablespoons sugar
1 ½ -teaspoons kosher salt
Combine ingredients and allow to sit for at least an hour. The longer they sit the better they’ll get.
Other Accompaniments:
2 cups short grain rice (sushi rice)
1 head Bibb lettuce


