Two Fourth of July Dips

Real Salsa and Yuppie Salsa

IMG_0915    IMG_0920

A good friend, whom I’m lucky enough to have live just a block away, holds a Fourth of July barbecue every year. The Fourth also happens to be her husband’s birthday, so it’s a pretty serious party. Since the first of these parties, I’ve tried to bring something special-usually something with a naughty twist to it. The first year was Macedonia di Frutti, an alcoholic fruit salad; the second year was Crack Pie; and the third year was absinthe ice cream. This year, however, I couldn’t think of a thing to make, so I asked my friend what she’d like me to bring. Ever the practical party host, she asked for salsa. However, being me, I went to town on the whole salsa idea and decided to bring a duo of salsas.

The first is your very serious, very spicy, salsa roja picante. Blackened tomatoes, jalapenos and garlic pureed into a hot as hell salsa. It’s the real deal. The second is my yuppie salsa, my champagne and smoked salmon to bring in the anniversary of the nation kind of salsa: apricot salsa with mint. The hope is that the two will balance each other out.

Salsa Roja

Adapted from epicurious.com

2 tomatoes

2 jalapenos

1 clove unpeeled garlic

kosher salt

1.)   In a cast-iron skillet dry roast the vegetables and garlic. When the garlic skin is totally brown on all sides, take it out and peel it.

2.)   Roast the tomatoes and jalapenos until they’re black and peeling on all sides. This may take awhile and your house will get pretty smoky while they’re cooking. Still, it feels very primal and it looks damned pretty, so enjoy it.

IMG_0903IMG_0907

3.)   Peel the garlic and jalapeno and mash them into a pulp.

IMG_0910

4.)   Skin the tomatoes and add all the ingredients to a food processor and process until smooth.

5.)   For a smoother texture, pour through a mesh strainer to get out the tomato seeds, making sure to pound the tomato pulp back into the salsa with the back of a spoon.

6.)   Season and serve.

Apricot Mint Salsa

Adapted from Saveur

Juice of 2 oranges

½ cup white wine vinegar

1 ½ teaspoon kosher salt

3 garlic cloves, minced

1 jalapeno, deseeded and minced

¼ cup chopped mint

¼ cup chopped cilantro

1.)   Boil juice over medium heat until it turns into a thin syrup.

2.)   Add vinegar and salt and continue cooking until salt dissolves

3.)   Return to boil and add apricots, garlic, jalapeno, and onion. Reduce heat and cook, covered for about 5 to 7 minutes.

IMG_0911

4.)   Wait to cool and add herbs.

Pickled Peppers

Okay, so way way too late for Passover. Actually, this last Passover I basically cooked an entire meal for thirty people practically by myself so I didn’t have time for blogging. This was followed shortly thereafter by a bridal shower that I hosted and cooked for also entirely by myself.

Yeah…I’m not bitter or anything.

I get myself into these fixes. I like cooking so much that I’m always volunteering to cook and then driving myself bat shit by doing too much. Ambition is dangerous, especially where meals for huge groups of people are involved. There’s so much that goes into it: artistry, skill, taste, time, and money. Not to mention all the variables involved in who will be eating your food and what’s expected of you. Once status and class-consciousness come into it then you can forget about enjoying yourself.

All I’ve learned the last few months of intensive cooking is that you should only really put yourself out in the kitchen for people who love you.

I give you now, pickled peppers. I made these for Passover. They were on the table during the ceremony and had disappeared before the appetizer course.

pickled peppers

Adapted from Jewish Home Cooking by Arthur Schwartz

6 red bell peppers

1 ¼ cups white vinegar

1 ¼ cups water

½ teaspoon salt

2 tablespoons sugar

2 mounded tablespoons minced garlic

1.)   Roast peppers on stovetop over open flames until completely blackened all over. Turn on the oven fan and open the windows. This gets smoky. Do not leave unattended.

2.)   Once peppers are blackened put them in a glass or metal bowl and cover with plastic wrap.

3.)   Once cool, halve them and scrape off blackened skin under a cold tap, then remove ribs and seeds with a sharp knife.

4.)   Combine vinegar and water in a saucepan and bring to a boil. Add the salt, sugar and garlic, remove from heat and pour over peppers.

5.)   Pack into a wide mouth jar, weighing down the peppers so they don’t float to the top, and allow to sit on the counter for one day. After one day refrigerate. It should keep for several months.

pickled peppers2

Blood Orange Liqueur

The first time I’d even heard of blood oranges I was in Rome on a school choir trip my senior year of high school. We had a free hour before dinner, and I’d tagged along with the coolest kids in my grade to the corner store for vodka mixers for a hotel room party. One of the girls bought a container of blood orange juice and it seemed proof positive of their cool superiority: they didn’t just drink screwdrivers, they drank blood orange screwdrivers.

I never actually got to taste it. It was a sopranos only party. This turned out to be a good thing because at the party one boy dropped a bottle of vodka down seven stories from the window and almost killed someone. Half the kids there got suspended. So for once being a loser stick-in-the-mud turned out to be to my benefit.

But who am I kidding…I still wish I’d been invited to that party. Blood orange screwdrivers, the popular kids, and nearness to manslaughter…it would’ve been the best night of high school. And probably also the worst. It would’ve made a better story all the same.

This liqueur is silky and sweet with a little hint of bitterness just to keep things interesting. The burnt umber color lights up the room and I’m looking forward to the bridal shower I’m throwing in May so I can make up a gorgeous blood orange punch.

This recipe isn’t difficult but it is arduous. I’ve got an electric citrus juicer and I was still stiff-muscled in the wrists the next day. Juicing zested oranges is a serious pain.

Make sure you keep it infusing for the full six weeks. It makes the vodka nice and silky.

IMG_0707

Blood Orange Liqueur

8 blood oranges

4 cups vodka

2 cups sugar

Half-gallon wide mouth jar with lid.

IMG_0694

1.) Wash and dry the oranges thoroughly. Peel off the zest with your best peeler, peeling off the strips as long and thick as possible so it’s easy to scrape any pith off with a paring knife when you’re done.

IMG_0701

2.) Set aside the peel and juice the oranges.

IMG_0702

3.) Add vodka, sugar, juice, and peels into the jar and shake for 30 seconds.

IMG_0705


4.) Put jar in a cool dark place for 6 weeks and shake once a week.


5.) Strain the mixture first through cheesecloth, and then through a coffee filter into a swing top glass bottle.

Slivovitz

IMG_0520

I’d bought the last of the summer plums at the farmer’s market and hauled them home. I’d combined them with sugar, vodka, lemon peel, and spices, and then waited the long 3 months and two weeks for the fruit to infuse. Before I’d tasted the liqueur I’d just hoped it wouldn’t kill me. It seemed that surely some crazy new bacteria that only exists in basement apartments in Brooklyn had gotten into the infusion. But then I tasted it. My first thought was that it didn’t taste much like plums; it was more like strawberries, but not even strawberries: strawberries that have been liquified, boiled, turned into a gas, and then inhaled as a vapor. It tasted sweet and pure and profound. It tasted like what you imagine wine to taste like before you’ve ever tasted it: like the word ‘wine’ as the word is slipping from your tongue.

Make this for Christmas. Or actually, screw Christmas, make it for yourself and hoard it and hide it from your friends.

Slivovitz

Adapted from The Washington Post

2 ½ lbs prune plums

1 ½ cups sugar

2 1-inch pieces lemon peel

4 cups vodka (plus more if needed)

2 wide mouth half gallon jars

2 cinnamon sticks

1.)    Making sure each fruit is perfect and without bruising before cutting, pierce each fruit to the put with a knife, cutting each plum several times.

2.)    Pack fruit into jars and add sugar, cinnamon, and peel. Pour in enough vodka to cover plums completely and secure lids on jars.

IMG_0521

IMG_0522

3.)    Keep jars in a cool, dark place and turn them once a day for two weeks until the sugar has dissolved.

4.)    Keeping them right side up, leave them in the cool, dark place for 90 days.

5.)    Strain first through a cheesecloth, discarding fruit, peel, and cinnamon, and then strain the liquid  through a coffee filter.

IMG_0648

IMG_0652

Wine Jelly


IMG_0596

The guy working at my wine store looked at me like I had two heads when I told him I needed a dry white to make wine jelly out of. The guys who work at my wine store are of a species of fake connoisseurs that I like to think of as dumb nerds. In my years as a college professor I’ve taught many such people: young kids who know a little something about something that’s got a whiff of sophistication to it. They’re not experts, but they take on the mean-spirited and arrogant demeanor that they believe an expert would have. Not that wine jelly is the least bit sophisticated. I was just amused by the look of horror on the face of my liquor store man when I told him what my wine was getting used for.

Wine jelly is incredibly easy to make. It’s already liquid and seeing as you’ve got to use liquid pectin to make it, there’s not a lot of time that goes into this. All you need to worry about is sterilizing your jars, bands, and lids for canning. That takes a little time, but the jelly making is very simple.

Herbes de Provence Wine Jelly

Adapted from the Ball Complete Book of Home Preserving

2 cups dry white wine

1 tbsp herbes de Provence

2 cups sugar

1 pouch (3 oz) liquid pectin

1.)   Start heating the water in water bath canner.

2.)   Combine wine and herbs and bring to a boil. Remove from heat and steep for 20 minutes.

IMG_0593

3.)   Line a mesh strainer with cheesecloth and strain mixture.

IMG_0595

4.)   Measure out 1 3/4ths cups of infused wine.

5.)   Prepare canner, jars, and lids.

6.)   Put wine in a saucepan and stir in sugar. Stir constantly over high heat until it reaches a high boil. Stir in pectin and boil, constantly stirring, 2 minutes. Remove from heat and use the freezer test. Skim off foam and pour jelly into prepared jars. Screw on lids and bands until fingertip tight.

7.)   Place jars in the canner, making sure they’re covered with water. Bring to a boil and process for 10 minutes. Remove canner lid, wait 5 minutes, then remove jars.

8.)   Leave jelly jars on a damp towel on counter top overnight.

Apple Jelly

IMG_0534            IMG_0562

I kept thinking on Nietzsche while I was making this jelly. My boyfriend and I had gone to the farm, picked the apples from the trees, and then hauled them all the way home. That was just the beginning. Then came the jelly-making process, two days of boiling, juice dripping, mashing, cooking, and finally canning. The process by which the Dionysian fruits of the earth are transformed into formally perfect Apollonian objects had never been clearer to me. I’ll never look at a jar of Smucker’s the same again.

Apple Jelly

Adapted from David Lebowitz

8 lbs apples

10 cups water

6 cups sugar

Juice of 1 lemon

1 tablespoon Calvados or other brandy

1.)   Wash and chop apples into coarse chunks, and put everything, including the cores and the seeds into your largest pot.

IMG_0538

2.)   Pour in water and boil. When boiling, reduce the heat, leave the lid off slightly, and cook for about a half hour until the apples are cooked.

IMG_0545

3.)   Line a wire-rimmed strainer with cheesecloth and set it over a large, deep bowl. Ladle the apple into the strainer and allow to stand overnight. Do not press down on the apples ever as this will make your jelly cloudy.

IMG_0541IMG_0547

4.)   The next day you should have about 8 cups of juice. Take the leftover fruit pulp and mash it through a strainer for applesauce.

IMG_0549IMG_0554

5.)   Pour the jelly into a good solid jelly-making pot and attach a candy thermometer to the pot. Add sugar and lemon juice and bring to a boil, skimming off the scum that rises to the surface.

IMG_0558

6.)   Cook until the candy thermometer reads 220 degrees Fahrenheit. At this temperature you can begin testing the jelly using the freezer method. If the jelly holds its shape, it’s done; if not continue to cook it and test it again in the freezer. The jelly-making process could take a long time, up to a couple of hours.

7.)   Sterilize jars, lids, and bands, and water bath process the filled jars for ten minutes.

IMG_0559IMG_0561

Membrillo Paste

IMG_0292

When it comes to sweets, I harbor a special love for all things chewy. From Swedish Fish and Twizzlers to Dutch salt licorice and pate de fruit. With the exception of the vile British Jelly Babies (Dr. Who was wrong!) I’ve almost never met a gummy candy I didn’t like. Juju Bees (whole movie theatre sized cartons of them) were my companion in misery during sad adolescent moments; red shoelace licorice accompanied me on college road trips; and in the first year of my relationship with my boyfriend, one of our earliest couple’s rituals was to devour an entire package of Red Vines while watching The Gilmore Girls. So yes, I’m a bit of a chewy candy addict.

But alas, a whole foods lifestyle allows for no Red Vines. I’ve mostly eliminated packaged sweets, but I’ve never been able to do without the occasional piece of licorice. Somehow pate de fruit never does the job. The stuff I’ve made at home doesn’t stiffen the way I want it to and it never gives your jaws the pleasurable workout you get from eating licorice.

Fortunately, there’s Dulce de Membrillo, or quince paste.

I’d have to say this is one of my favorite things to eat. It has the hard chewiness of licorice, but also the powerful flavor of quince. The fruit, cooked down over many hours, contains a flavor I can only compare to the smell of hot fruit cooking. The non plus ultra of chewy candies, it’s what you want all those packaged licorice bits to taste like; it’s what I yearned for in all those boxes of Juju Bees: true transmogrification of regular fruit into a wholly alien substance.

Dulce de Membrillo has a complex, sophisticated flavor and not all Twizzler gobblers may enjoy them. They are delicious by themselves, but are also good with a slice of sharp Manchengo cheese. Remember also that this candy sticks to your ribs. It’s sublime, but also dense. If you try to consume more than a few pieces in one sitting you will get a serious stomachache.

 Dulce de Membrillo

(Adapted from Ready for Dessert by David Lebovitz)

4 quinces

½ lemon

4 cups water

3 cups sugar

1.)   Wash the quinces and cut into quarters. In a pot combine quince, lemon, and water and cook on medium heat for one hour, until the quince is tender.

2.)   Discard lemon and using a spoon or a melon baler, scoop the seeds out of your now tenderized quince pieces. Discard lemon and push cooking liquid and quince pieces through a wire mesh strainer.

3.)   Put quince puree and sugar in a good cast iron saucepan (I used my Le Creuset) and cook over medium low heat, stirring constantly. Wear oven mitts. The puree will spit at you while it cooks.

4.)   Next comes the hard part. You’ve pretty much got to keep stirring for as long as it takes. Just stir the motherfucker until it is a thick mass, so thick your spoon can stand straight up in it by itself.  It should be a dark red color and incredibly difficult to stir by the time you’re finished. I’ve stirred membrillo for two and a half hours in the past. It may take you only an hour and a half so long as you keep your pot good and hot.

5.)   Get out a small baking sheet and line it with parchment paper. Spread quince paste in a layer. Once it’s cool enough, spread it smooth with your hand. Let it cool and then cut it into bite-sized pieces.

IMG_0293

thumb_IMG_0300.JPG_1024

Membrillo paste on the cheese plate at the holiday party.

Thanksgivingkkah Doughnuts

IMG_0600

I have never been that big a fan of Thanksgiving: lots of mediocre food, mediocre relatives, and hours and hours of boredom sitting around waiting to eat a not that amazing meal. Light glaring through the windows during the meal because you’re eating in the middle of the afternoon; then many more hours of boredom plus indigestion as you sit around some more waiting for the moment when you can make your exit. So maybe some people’s Thanksgivings aren’t like this. I’m sure your family is full of gourmet chefs, has fun Thanksgiving traditions and games involving jumping into piles of leaves, and playing cutthroat games of UNO. Maybe you even like football. But every year it’s my least looked forward to holiday. It’s the one to be gotten over with, not enjoyed.

But then it fell on Hanukkah. Which is a holiday I really love. Latkes and applesauce, presents and candles. There are songs and prayers that I actually know. It’s a holiday that, unlike Thanksgiving, my family actually knows how to do. So hopefully tonight Hanukkah will cancel out the Thanksgiving doldrums and we might all have a nice time.

My mother this year asked me to make dessert, and I went kind of crazy making the perfect Thanksgivingkkah sweets.

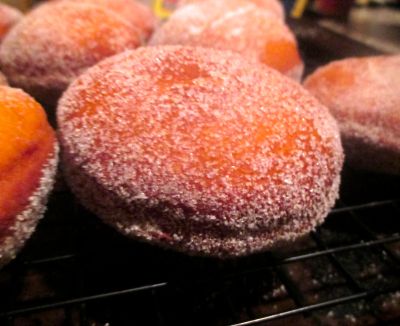
I’ve always thought that a big dinner should end with light, refreshing desserts, not heavy ones. So I skipped the pies and went for frozen sweets instead. I made one ice cream or sorbet for each of the traditional Thanksgiving dessert flavors: pumpkin ginger ice cream, Mexican chocolate pecan ice cream, and persimmon sorbet. And of course because I can’t help myself, and because it’s Thanksgivingkkah, I also made special Thanksgiving sufganiyot, or Hanukkah doughnuts. They’re apple cider flavored and caramel filled.

For this recipe you’ll need a pastry bag, a rolling pin, parchment paper, and a candy thermometer.

Thanksgivingkkah Sufganiyot

(Adapted from Chow.com)

 For Doughnuts:

2 ½ cups all purpose flour

1 teaspoon cinnamon

½ teaspoon salt

Pinch grated nutmeg

1 tablespoon vegetable oil

1 (¼ ounce) packed active dry yeast

¼ plus 1 teaspoon sugar

¾ cup apple cider

2 egg yolks

1 tablespoon apple sauce

1 teaspoon vanilla extract

1 tablespoon unsalted butter, room temperature, cut into 4 pieces.

For Caramel Filling:

1 cups sugar

¼ cup water

¼ teaspoon plus 1/8 teaspoon salt

1/3 cups heavy cream

1 teaspoon vanilla

For frying doughnuts:

2 quarts vegetable oil

½ cup sugar

To make the doughnuts:

1.)   Coat a large bowl with vegetable oil

2.)   Combine flour, cinnamon salt, and nutmeg in a large bowl and whisk.

3.)   Place yeast and 1 teaspoon sugar in a medium bowl.

4.)   Heat ½ cup apple cider until warm (about 110 degrees) and add to yeast and sugar, stirring to combine. Let mixture sit for 5 minutes.

5.)   Add ¼ cup sugar, ¼ cup apple cider, yolks, applesauce, and vanilla to yeast mixture and whisk together.

6.)   Add yeast mixture to flour mixture and stir until dough comes together into a ball.

7.)   Transfer dough to floured surface. Scatter butter pieces in dough and knead dough until butter is incorporated and dough is smooth (about 7 minutes)

8.)   Form dough into a ball, place in oiled bowl and roll it around until coated in oil. Cover and let sit 2 hours until doubled in size.

For Caramel:

1.)   Before the dough has risen, place sugar, water, and salt in a saucepan and boil over medium heat, stirring until sugar is dissolved.

2.)   Boil, swirling (not stirring the pan until it turns dark amber (about 10 minutes)

3.)   Remove from heat and stir in cream and vanilla. The mixture will boil violently. Transfer to a heatproof bowl and allow the caramel to cool completely.

Rolling out and frying doughnuts:

1.)   Line a baking sheet with parchment paper.

2.)   Punch down dough and roll out on a floured surface until ¼ inch thigh.

3.)   Using a 2-inch cookie cutter (or a wide rimmed wine glass) cut out dough rounds and place on parchment paper. Gather scraps and continue to roll up until all the dough is used.

4.)   Cover doughnuts with plastic wrap and allow to rise for half an hour more.

5.)   Heat oil in a heavy-bottomed pan over medium heat until temperature reaches 365 degrees on your candy thermometer.

6.)   While oil is heating up, fill a pastry bag with a small round tip with the caramel sauce. Put sugar in a small bowl and set a cooling rack over a cookie sheet.

7.)   When oil is hot enough add 4 doughnuts and fry until golden brown, about one minute per side. The doughnuts should puff up in frying.

8.)   When first batch is done, set on a rack and put in the next batch. While next batch is frying using tongs, take the finished doughnuts and roll around in the bowl of sugar. Repeat process until all doughnuts are finished.

9.)   Once all the frying is completed and the doughnuts are cool enough to handle, cut a small hole in each of them with a paring knife. Then taking the pastry bag in two hands (one to hold it closed, the other to pipe the caramel) fill each doughnut with about a tablespoon’s worth of filling. Doughnuts are ideally consumed immediately, but can be kept overnight in an airtight container and reheated in a hot oven the following day.

IMG_0599

Palo Santo’s Bluefish with Plantain, Hot Slaw, and Salsa Verde

We’ve been going to Palo Santo in Park Slope since they first opened their doors years ago. I think it’s the best restaurant in the neighborhood, and that’s not just because of their hearty portions and the free glasses of Prosecco they give us every time we go. At Palo Santo, one is overwhelmed by the flavor of the food, and not by rococo cooking methods. The complexities in their dishes come from artful combinations: from dynamic relationships, and never from an abundance of sauces and seasonings. For these reasons and many more, Palo Santo is singular among Brooklyn locovore restaurants.

When I found this recipe for Palo Santo’s Bluefish with Plantain, Hot Slaw, and Salsa Verde in The New Brooklyn Cookbook, I got a little nervous. What if the sweet, succulent plantain that I so looked forward to was actually easy to make at home. If I could cook Palo Santo, then could I justify the expense of a full meal there, just to shoot the shit with Gonzalo as he brought us our free Proseccos?

This is by far the best blue fish recipe I’ve ever made. The sharpness of the hot slaw, and the sweetness of the plantain, rise up to meet the strong, oily flavor of the fish like no other bluefish recipe I know.

It was of course not as good as the Palo Santo dish. Apparently, you’re not supposed to cook plantains while they’re still green. Who knew? Anyway, I’ll still be going to the restaurant every few months. I still don’t know how to make their grilled steak and fried yucca.

Blue Fish with Plantain, Hot Slaw, and Salsa Verde

Adapted from The New Brooklyn Cookbook

Hot Slaw

½ head red cabbage, shredded

1 jalapeno, seeded and minced

1 garlic clove, minced

1 tablespoon white wine vinegar

2 tablespoons olive oil

Coarse salt and pepper to taste

1.)   Combine cabbage, jalapeno, garlic, vinegar, and oil in large bowl. Season to taste and set aside to marinate.

IMG_0472

Salsa Verde

10 ounces tomatillos

1/3 cup chives, minced

1 jalapeno, seeded and minced

Juice of 1 lime

1 tablespoon olive oil

Coarse salt

1.)   On each of the tomatillos, make an x at the bottom with a paring knife. Bring a pot of water to boil and prepare an ice bath. Blanch tomatillos until skin splits. This could be a few seconds or a few minutes, depending on the tomatillos.

2.)   Remove from boiling water and plunge into ice bath when skin splits, then chop.

IMG_0475

3.)   Place in a small bowl with chives, jalapeno, limejuice, and oil. Season to taste.

IMG_0478

Plantains

3 ripe plantains (yellow, not green)

1 tablespoon butter

1.)   Preheat oven to 425 degrees Fahrenheit. Roast plantains on rimmed baking sheet until they puff up and burst, about 20 minutes.

IMG_0470IMG_0484

2.)   Remove from oven and allow to cool. When you can touch them, slice them lengthways and brush cut side with butter.

3.)   Return to oven for another 10 minutes, or until golden brown.

Bluefish

6 8-ounce bluefish fillets

Coarse salt and pepper.

2 tablespoons cooking fat

1.)   Heat ovenproof skillet with fat

2.)   Season fish with salt and pepper and sauté fish, skin side down 2 or 3 minutes, or until skin is golden.

3.)   Place pan in oven to finish cooking fish, about 5 minutes.

IMG_0480

To serve, place an unpeeled plantain half on each plate and a mound of slaw next to the plantain. Place fish on top of the slaw and garnish with salsa verde.

 IMG_0488

Peanut Butter

One summer at camp, a counselor who hailed from Sweden looked over at the peanut butter and jelly sandwich I’d made at lunchtime, and exclaimed, “What an interesting combination! How inventive you are.” At eight I was embarrassed by my avant garde PB and J and didn’t enlighten her.

It is of course a singular American invention, the peanut butter and jelly sandwich. Fat and sugar slathered in bright, chemical smears on factory-produced bread. It seems amazing that even in the eighties a teenage swede wasn’t culturally with it enough know about this most iconic American sandwich.

Besides that, I’ve really no other stories about peanut butter. I like it chunky and slathered liberally. This recipe gives you an excuse to eat quantities of it as an adult, guilt-free. An apple from my farmer’s market, accompanied by a jar of this peanut butter has been my much-looked-forward-to TV snack all week.

I used hazelnut oil for my peanut butter, as that’s what I had in the house, but feel free to use whichever kind of nut oil you fancy.

Peanut Butter

Adapted from the Food Network

1 lb roasted peanuts

1 tablespoon (and more to taste) kosher salt

2 teaspoons honey

2 tablespoons (or more for preferred texture) nut oil.

1.)   Put peanuts, salt, and honey in a food processor and process until smooth.

IMG_0492IMG_0494

2.)   Scrape down sides of bowl. Put lid back on and continue to process while drizzling in the oil. Continue drizzling until peanut butter is at the texture you like. It can be anywhere from silky to crumbly.

IMG_0496

3.)   Season to taste.